Advanced git Techniques
Handouts for this lesson need to be saved on your computer. Download and unzip this material into the directory (a.k.a. folder) where you plan to work.
Lesson Objectives
- Build on the techniques learned in the basic git lesson with more advanced topics
- Use git and GitHub to work with collaborators inside and outside your immediate research group
- Publicize your work with GitHub Pages
Specific Achievements
- Create, modify, and merge branches to reduce conflict within your project and with collaborators
- Fork a repository to add your own contributions to someone else’s project
- Make and accept pull requests for smooth and respectful collaboration
- Use GitHub Issues to document and manage your work
- Create and edit GitHub Pages for your user account and for one of your projects
Prerequisites
You should be able to do the basic git actions described in the Basic git Lesson or the Git in the Shell lesson: set up a repo, stage changes, commit, push, and pull.
Please review one of the basic git lessons to make sure you are up to speed before proceeding with this lesson.
In addition, you should have a general idea of how Unix shell commands work.
These commands have their own special syntax.
If you aren’t familiar with Unix shell commands, you might want to
look at this lesson from Software Carpentry.
Or check out explainshell.com, which is a
handy tool that gives you the help text associated with specific shell
commands, including git commands.
Why do I care?
The basic git lesson gives you most of what you need to work on your own or with occasional help from a collaborator. If you are interested in building your git skills to deal with more complicated workflows, this lesson is intended for you!
Before you continue, it’s important to note that a lot of these procedures are more widely used for software development than for research purposes. In software (or website) development, you have to be very careful about making unnecessary changes that might “break” the code and render everything useless. However, if you are doing exploratory statistical analysis or visualization, there is usually no harm in adding extra scripts to a repository or tacking on a few more lines to make another figure or data summary. Because individual data analysis scripts are usually fairly self-contained, even if you make mistakes, you rarely break other code in the project. 95% of what you need to do in the typical research workflow can be accomplished with stage, commit, push, pull, and the occasional resolving of a merge conflict.
With all of that said, though, even if you rarely or never use some of these techniques, it is helpful just to be exposed to them and know the lingo. You may run across these terms being used and it is good to have some idea of what’s going on.
Branches
A branch is a separate “version” of a repo with its own history — it is not a separate copy, it exists within the repo where it was created.
In the following images, circles represent successive commits through time, going from left to right.
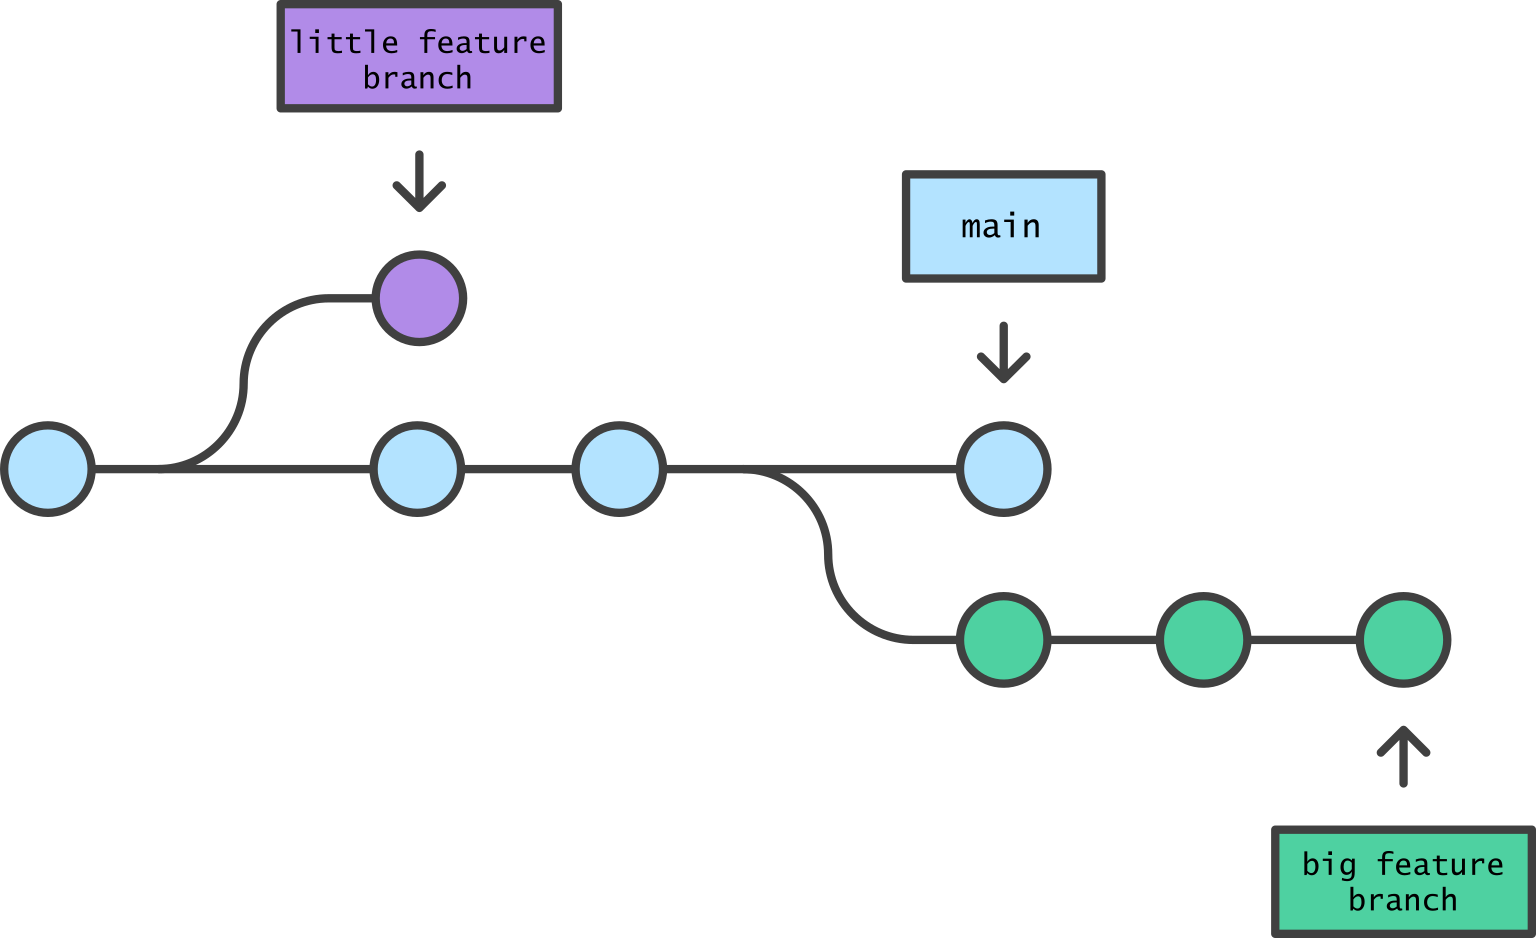
Two branches created from the main branch, each with their own commit history. Image by Atlassian / CC BY
The expectation is that you are going to make some changes to temporarily test things out, and then either merge the commits you made in the side branch back into the main branch, or delete/abandon the branch if you don’t want to incorporate the changes you made there.
The primary branch, from which side branches are typically made, is called the main branch by default.
This default applies if the repo was created on GitHub after October 1, 2020.
In older repos or repos that you create locally with the command-line git client or the RStudio project interface,
this branch is called master. This is a positive change, signaling that GitHub is committed to inclusion,
but do be aware that it may cause conflicts depending on where you create your repos.
Also be aware of this when reading documentation, tutorials, or StackOverflow posts written before 2020.
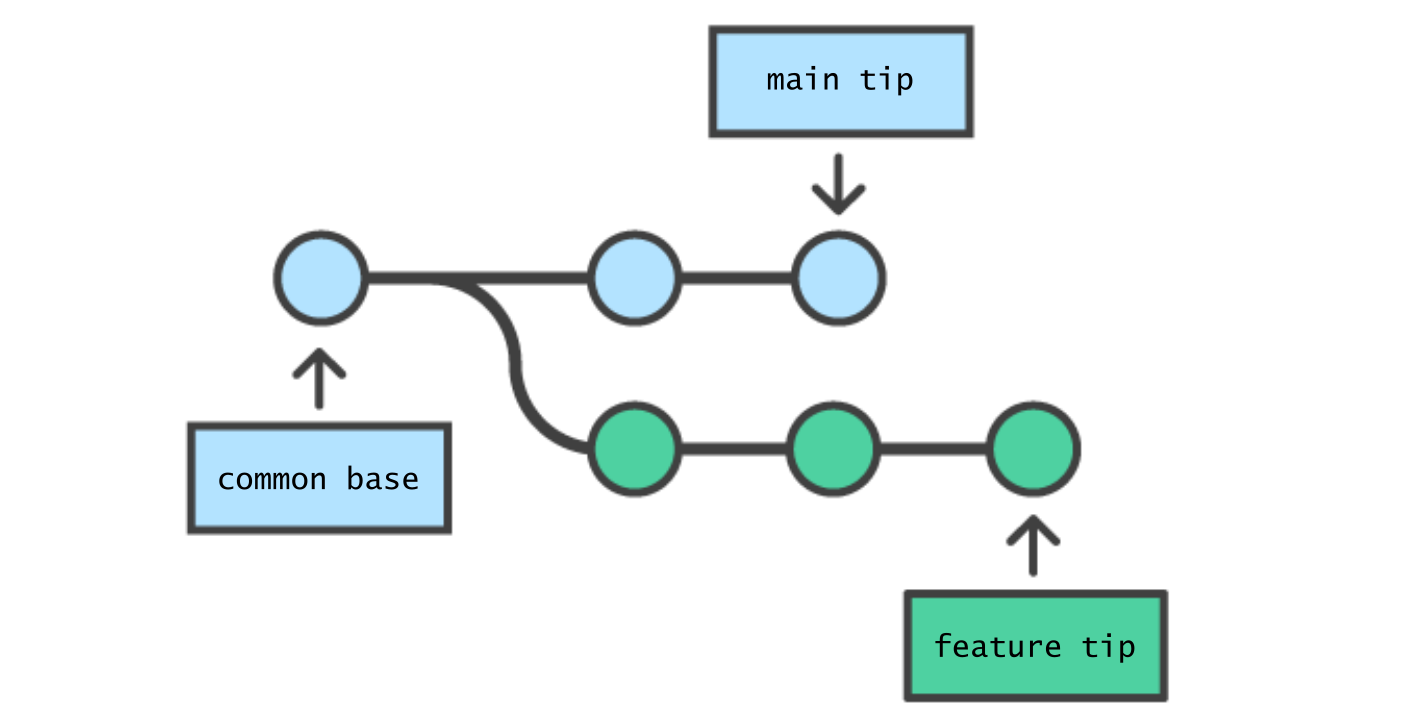
The main and feature branch have a common base but different tips (current states). Image by Atlassian / CC BY
A clarifying note: The distinction between, on the one hand, local versus remote (origin) and, on the other hand, the main branch versus other branches can be confusing at first. You can have multiple branches on both the local and remote copies of the repository. The local and remote branches are not necessarily the same. But if you want to push to, or pull from, the remote, the default will be the main branch unless you specify which branch you are pushing, or pulling.
When you are finished working in a branch, you can merge the branch back into the main branch. This will incorporate the work you’ve done into the “official” version of the repository.
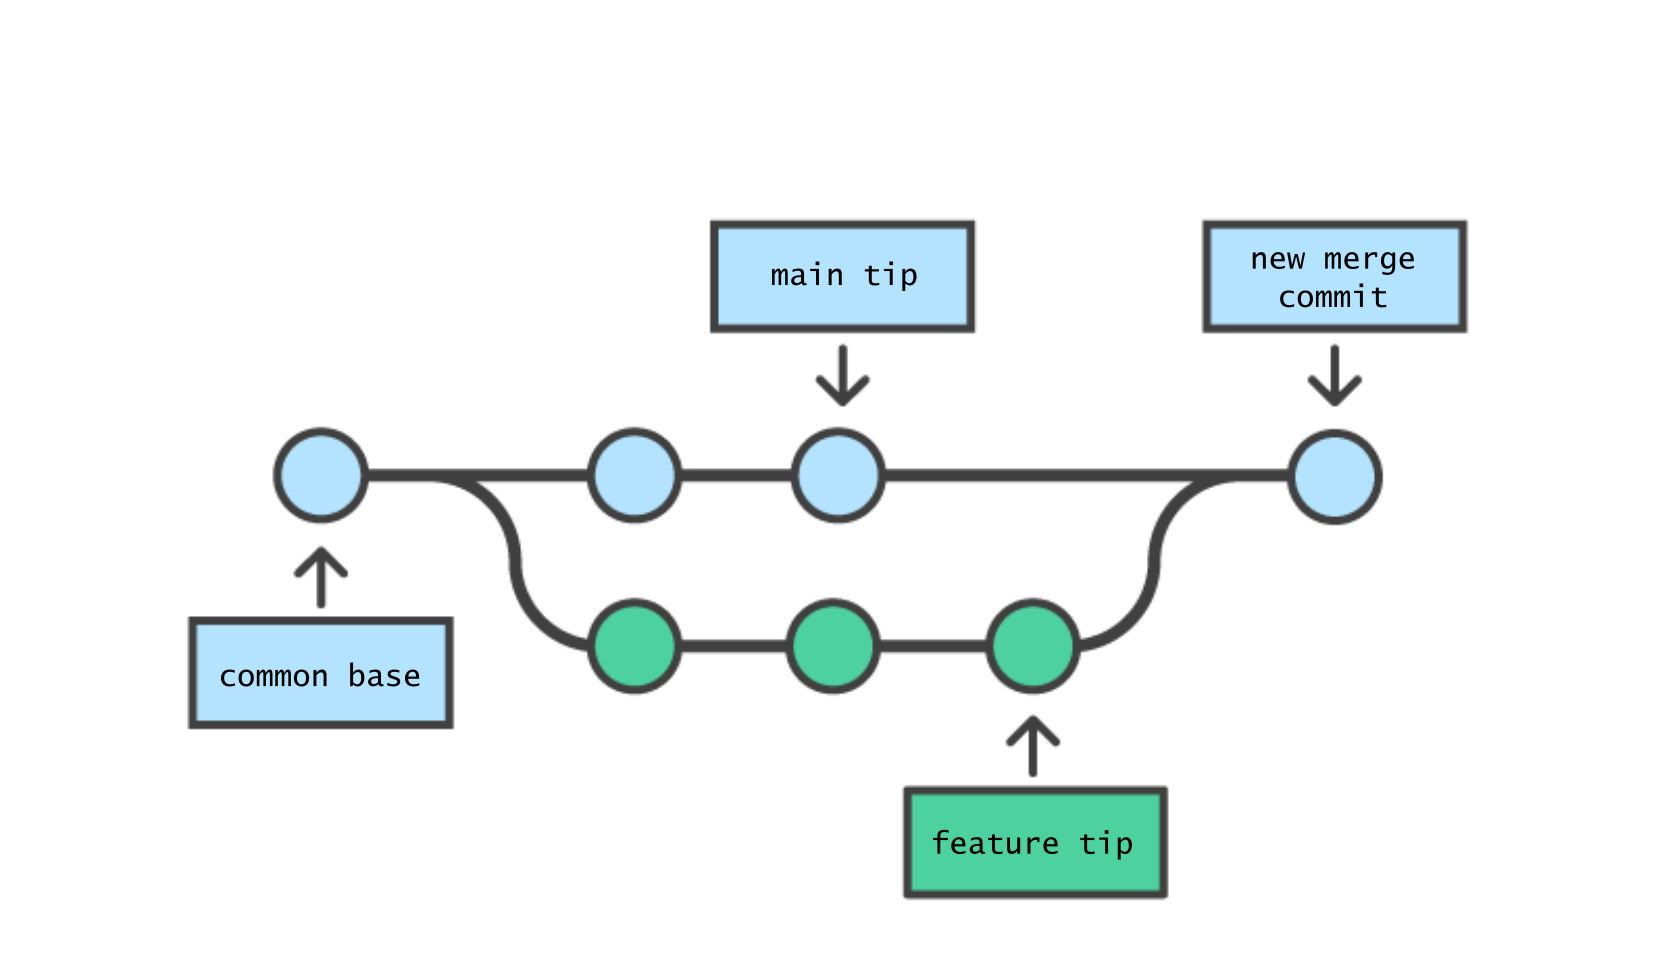
A merge commit joins the feature branch back to the main branch. Image by Atlassian / CC BY
Use cases for branches
- Making your collaborative workflow smoother
If several collaborators are working on code simultaneously, each one can create their own branch, pushing commits as they work. No merge conflicts would occur in the main branch during that time, saving the hassle of resolving many little conflicts one by one. When everyone is done, they merge their branches into the main branch and resolve everything at once.
- Making pull requests
Suggesting a change to someone else’s repo, whether it’s your collaborator’s repo or someone else’s, requires you to create a branch and make a pull request from that branch. We will cover pull requests in depth later on in this lesson.
- Testing code in software and web development
For example, many R packages are downloadable directly from the GitHub repository. Let’s say the developer is testing out changes that she wants to push to GitHub so that other collaborators can see them. In that situation, it is ideal to create a branch. If the branch is pushed to the remote, it will be accessible to other collaborators but not to people that download the main branch. It’s also a good idea to use branches to test out changes to websites hosted on GitHub Pages before going live.
Branch workflow
- Create a new branch locally
- Switch to the new branch locally.
- Push the local branch to the remote repo.
- Make some changes, stage, commit, and push (repeat as needed).
- Merge the branch back into the main branch.
First, let’s practice a basic branch workflow using the command line.
Create a repository
If you don’t have a repo to practice on, go ahead and create one. Your choices are to create a repo locally and then push the repo to the remote (GitHub), or to create the repo remotely on GitHub and then clone it locally. You should know how to do either of those things from the basic git lesson, but here we will quickly review how to create the repo remotely and clone it locally.
To create the repo remotely, follow these steps:
- Create a user account on GitHub.com if you don’t already have one.
- Create the repo by clicking on “New” on your Repositories tab on your GitHub user page.
- Give the repo a name and check the box to initialize the repo with a README.md file.
Open a terminal on your local machine and clone the new repo to the home directory.
Important: Make sure you cd to the directory where you want to clone the repo before cloning.
You don’t want to have repo folders nested inside each other!
git clone https://github.com/(your username)/(the repo name).git
In RStudio, an alternative to the command above is to
clone the repo into a new RStudio project by going to
File > New Project > Version Control and entering the repo URL.
This will integrate version control with RStudio’s project structure.
If there are no .Rproj or .gitignore files in the repo you are cloning, this will create them.
 These are the three steps to follow to clone the project with RStudio’s dialog.
Create branch locally
You can create a branch from the terminal or point-and-click-style in RStudio. We’ll start by using the terminal.
Create a new branch in your local repo with the git branch command.
Give it a name with only letters, numbers, and hyphens (no spaces, because it will be part of a URL).
git branch my-new-branch
Switch to the branch
Use git checkout to “check out”, or switch to, the newly created branch.
git checkout my-new-branch
Switched to branch 'my-new-branch'
Alternatively, as a shortcut, you can simultaneously create and switch to a new branch this way:
git checkout -b my-new-branch
If there are already multiple branches, you can specify the branch from which you want to create your new branch:
git checkout -b my-new-branch an-old-branch. If you do not specify, the branch is created from the branch you are
currently in (which usually defaults to the main branch).
Push the local branch to the remote repo
We need to add the newly created branch to the origin (remote repo) so that changes we commit and push
are pushed to that branch and not main. Do this using git push with the -u option,
which is short for --set-upstream. It makes sense to give the remote branch the same name as the
local branch.
git push -u origin my-new-branch
You will see this at the bottom of the output:
 * [new branch]      my-new-branch -> my-new-branch
Branch my-new-branch set up to track remote branch my-new-branch from origin.
Now that the local branch is set up to track the remote branch with the same name,
future pushes can be done using only git push.
Make some changes, stage, commit, and push.
You can simply say git push and it will push to my-new-branch on the remote. (This is equivalent to saying git push origin my-new-branch.)
git add /path/to/changed/file
git commit -m "Commit message"
git push
You can view all branches, both local and remote, with the -a option of git branch.
The asterisk indicates the branch you are in locally.
git branch -a
  main
* my-new-branch
  remotes/origin/HEAD -> origin/main
  remotes/origin/main
  remotes/origin/my-new-branch
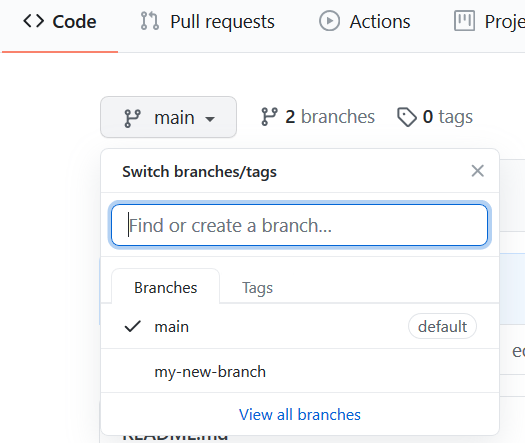
You can also view the branches on GitHub. Switch between them with the dropdown menu or view, create pull requests, or delete individual branches by clicking on “View all branches.”
Merge the branch into the main branch
Once you’re happy with the changes you’ve made, you can merge the branch into main.
First, switch back to the main branch on your local machine using git checkout.
git checkout main
Next, merge your branch into the main branch with git merge:
git merge my-new-branch
Fast-forward
 README.md | 4 ++++
 1 file changed, 4 insertions(+)
This will do a “fast-forward,” meaning that we skip the merging step because there are no conflicts between the two branches. If there were any conflicts, you’d have to resolve them first.
Push the main branch, with its newly merged commit, to the remote.
git push
Now you can continue your work in the main branch. To avoid cluttering up the repo with lots of old branches,
it’s a good idea to delete old unused branches. Use the -d option on git branch:
git branch -d my-new-branch
Deleted branch my-new-branch (was f06a00c)
Sometimes you will get a warning if the branch you are deleting has not been fully merged.
You can override this warning and delete an unmerged branch by replacing the -d with -D,
as in git branch -D my-new-branch.
The branch still exists on the remote repo on GitHub. You can delete it on the website or from the terminal:
git push origin --delete my-new-branch
- [deleted] my-new-branch
Note: You can also merge newer changes from the main branch into a side branch.
Just do the opposite of the above git checkout and git merge steps:
first checkout the side branch and then git merge main.
Point-and-click branching in RStudio
If it’s more your style you can use RStudio’s GUI for basic branching actions.
Create the branch by clicking “New Branch” on the Git tab in the upper right-hand corner.

In the dialog box that appears, enter the new branch name and select the option to sync with origin.
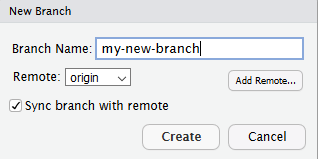
This will simultaneously create the branch, switch to the branch, and set up the local branch to track a remote branch!

You can switch among branches with the dropdown menu in the Git tab.
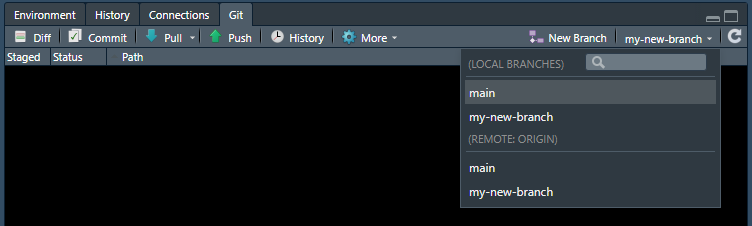
Unfortunately it’s not possible to merge branches with the point-and-click interface so you are stuck with
the command line when it’s time to git merge my-new-branch!
(This illustrates that the GUI is really only suitable for simple git actions.)
Forks

To fork a repo is to copy a repo from someone else’s account into your account so that you can start your own project based on the existing repo, without having to push changes to the original owner’s repo. In git jargon, a fork is just a “clone with a different remote origin.”
If you fork a repo, it is probably going to be one where you aren’t collaborating directly with its creator. The creator may continue to make updates, adding commits to their version’s history, while you do the same. A good example would be if you are making a GitHub Page, and you want to use a premade template. You would fork the page template repo and add your own content; you would likely never push changes to the template itself.
However, if you are working on a project that you forked from someone else’s repo, and you do want them to incorporate your changes into their version of the repo, you would make a pull request, which we will cover later in this lesson.
Forking a repo
To fork a repo on GitHub, just go to the repo page and click “Fork” in the upper right-hand corner.
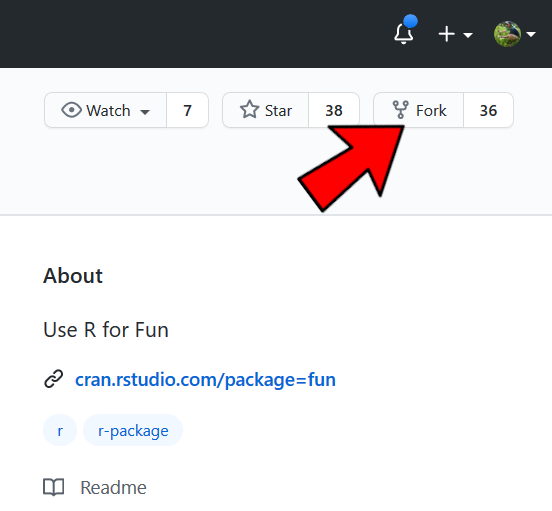
In this example we will fork the fun R package, originally developed by Yihui Xie. Go to https://github.com/yihui/fun and fork the repo into your account.
A few seconds later, you will have a copy of the repo in your account. Go back to your terminal to clone the forked repo to the home directory on your local machine.
As before, make sure you are in your home directory before running this.
git clone https://github.com/jdoe/fun.git
Cloning into 'fun'...
As before, an alternative to running the command above is to create a new project in RStudio, select “Version Control,” and enter the URL of the forked repo.
Now, when you commit and push changes to this repo, they will be pushed to the copy you own rather than the owner’s original copy. You probably do not want this behavior if you are directly working with a collaborator on the same project. In that case, you would just want to clone (not fork) the repo and keep the same remote origin as the collaborator.
Pull Requests
A pull request (PR for short) is just that: a request that the owner of a repo pull your changes, incorporating them into his or her repo.
You can make a pull request to any public repo on GitHub, even if you don’t have push access to the repo. In contrast, if you are a collaborator on a repo who has write access, you can push commits without making pull requests. However, it is often a good idea to make a pull request anyway, instead of pushing directly. This is a more respectful way to contribute to a project because it gives the repo owner a chance to review your changes and approve them.
Basic pull request workflow
- The “pull requester” forks someone else’s repository and clones it locally.
- S/he makes some changes, stages, commits, and pushes.
- On GitHub, s/he creates a pull request comparing the changes you just made with the original owner’s repo.
- The original owner creates a new branch and pulls the PR into that branch
- The owner tests the code, potentially adding additional changes and committing them.
- If the code is good, the owner accepts the PR by merging it into his or her main branch and pushing.
We will go through all these steps in the following part of the lesson.
Pull request walkthrough
For this part of the lesson, there are two roles, the Owner and Collaborator. Find a partner, and go through this exercise twice, each time taking a different role.
The Collaborator will make the PR and the Owner will modify, then accept it.
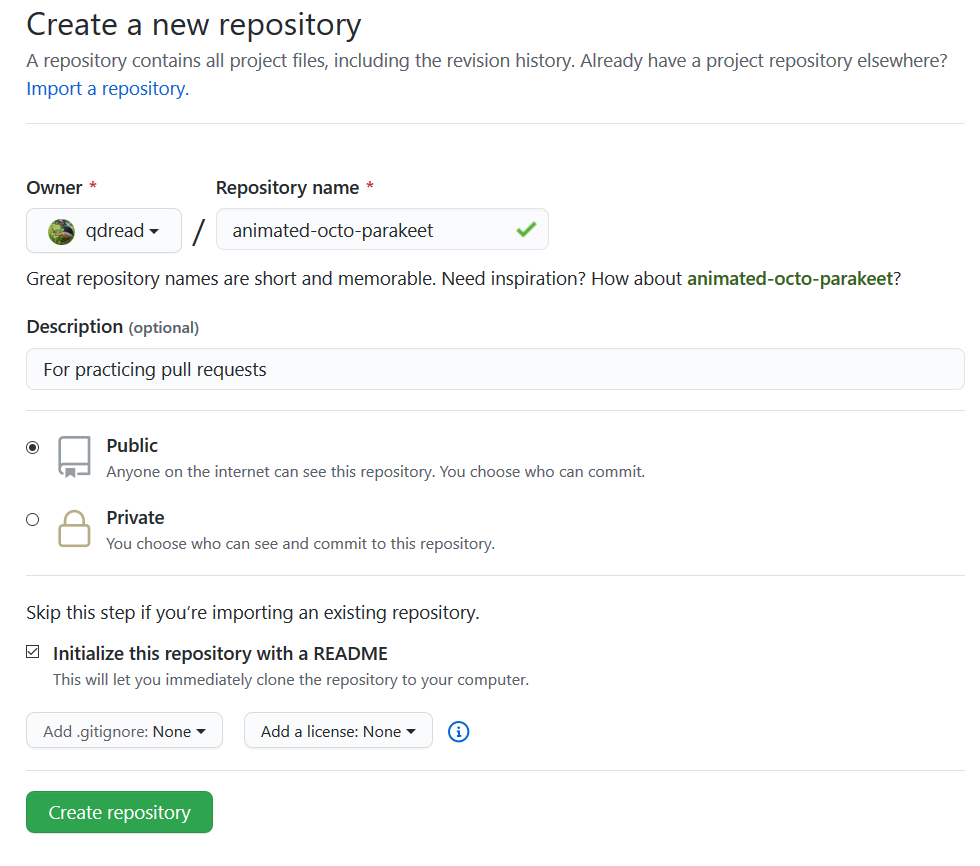
Owner: For this exercise, feel free to let the Collaborator fork one of your existing repos. If you don’t have a repo you own to practice on, quickly create one on GitHub.com.
Make sure it is a public repo so that the Collaborator can clone it. However, you do not need to give the Collaborator push access.
Initialize the created repo with a README.md to give the Collaborator something to work with.
If you haven’t already, clone the repo locally, either with the command line or using the “New Project” dialog in RStudio.
As before, make sure you cd to the right directory before cloning so you don’t get nested repos!
git clone https://github.com/(owner name)/(repo name).git
Cloning into 'repo name'...
Collaborator: Fork the Owner’s repo (on GitHub.com) and then clone it locally.
As before, you can either do this from the command line with the command below, or with the “New project” dialog.
git clone https://github.com/(collaborator name)/(repo name).git
Cloning into 'repo name'...
Now make a change to the README.md. Stage, commit, and push.
git add README.md
git commit -m "Edit README.md"
git push
The change you’ve pushed is now part of your forked copy of the repo, but is not yet incorporated into the Owner’s repo. Time to make a pull request.
Opening a PR
Collaborator: Go to the “Pull Requests” tab in your repo page on GitHub.
GitHub may automatically prompt you to make a pull request if you recently pushed changes.
Click on “New pull request.”
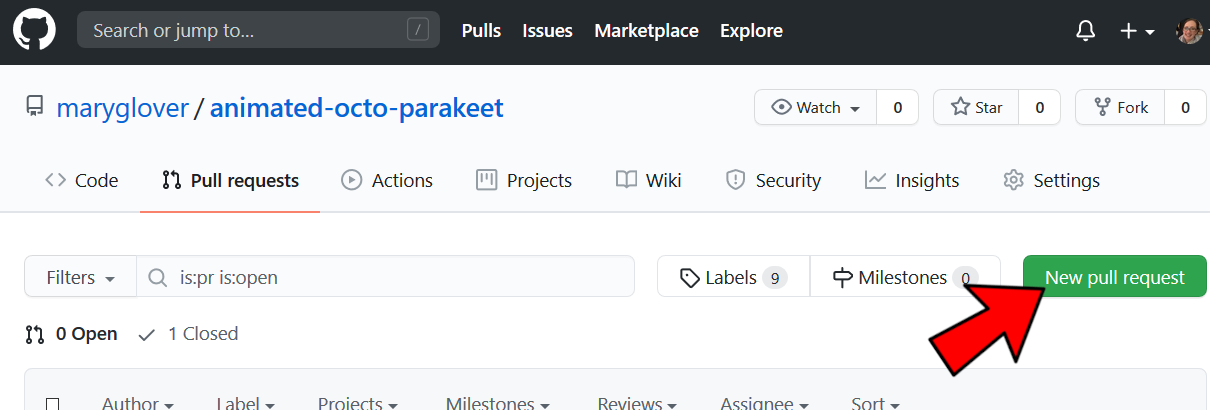
Collaborator: Specify that you want to “compare across forks.” You are making a PR
from your fork to the Owner’s repo, rather than across branches within the same copy of the repo.
Compare the main branch of your fork
with the main branch of the current repository, then click “Create pull request.”
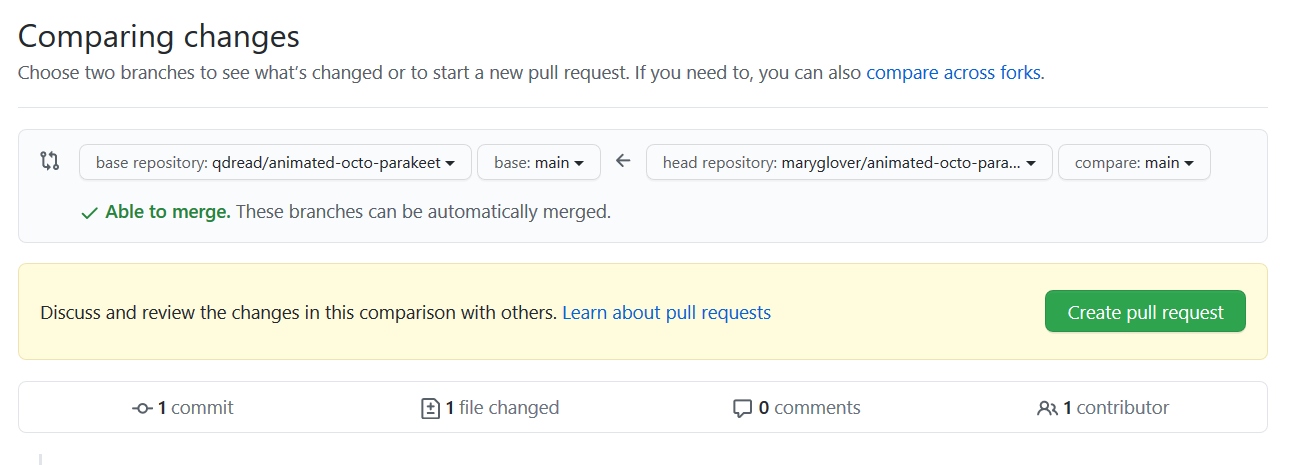
That’s it, you’ve just made a pull request!
You have made a request for the Owner of the repo to review the commits you’ve made to the code, in the hope that he or she will accept the request and add your changes to the primary official version of the repo.
Dealing with an open PR
Owner: As the owner, you will receive an email saying that someone has made a pull request on your repo.
By default you are “watching” any repo you create, meaning you will receive emails for new pull requests and new issues. You can disable this by selecting “Unwatch” in the upper right of the repo page on GitHub.
When you receive a pull request, you can do one of the following:
- Accept the pull request as is
- Make additional changes to the pull request and then accept
- Decline the pull request
In this example, we will simulate accepting the pull request without any additional modifications.
Owner: Even though the PR page shows that there are no conflicts, it is good practice to review the code before accepting and merging the PR. To do this, you need to create a new branch locally for the PR, and then pull the Collaborator’s changes into that local branch.
We will follow the command line instructions that GitHub helpfully provides. First create a new branch locally and switch to it.
git checkout -b pr-branch
Switched to a new branch 'pr-branch'
Pull the changes from the main branch of the Collaborator’s forked version of the repo into the newly created branch.
git pull https://github.com/(collaborator name)/(repo name).git main
After you have reviewed the code, accept the PR. There are two different ways to do this. You can either merge the PR into your main branch locally and then push to the remote, or you can merge the PR into your main branch on the remote repo on GitHub, and then pull the merged main branch locally.
In this example you will merge the PR locally and push to the remote.
Owner: Checkout your main branch again.
git checkout main
Switched to branch 'main'
Your branch is up to date with 'origin/main'.
Merge pr-branch into the main branch, then push to the remote.
git merge pr-branch
Fast-forward
 README.md | 2 ++
 1 file changed, 2 insertions(+)
git push
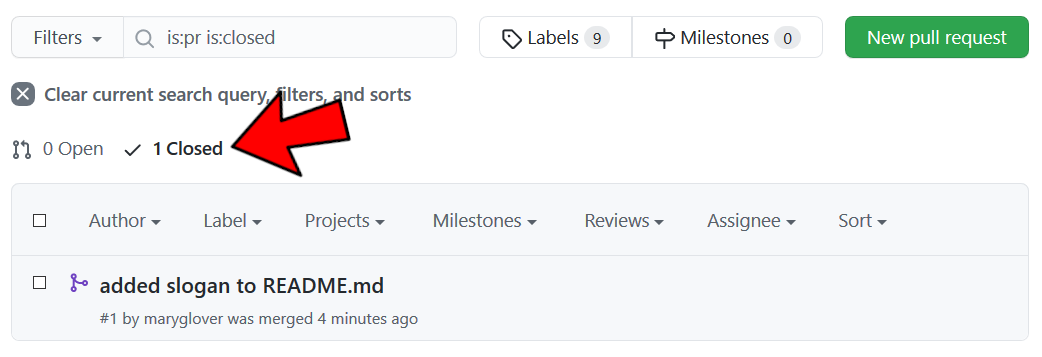
Owner: Go back to GitHub.com and view the PR page. You should see that the PR was automatically closed once you merged the changes into your main branch. It will be listed under the closed pull requests.
The commits made by your collaborator, and any modifications you may have made on top of them, are both part of the main branch of the repo.
An alternative to the above is to merge the pull request on GitHub.com (follow the point-and-click
instructions), then git pull into your main branch locally to get the merged changes.
You can delete the PR branch locally if you like:
git branch -d pr-branch
- [deleted] pr-branch
Collaborator: Now that the owner has merged your PR with the main branch on his or her repo, you should receive an email notifying you that your PR was merged.
Your repo should now be up to date with the Owner’s. However, in the future, if you want
to pull new changes from the main branch of the Owner’s repo into your forked repo, you
need to specify that you are pulling from the Owner’s repo in your call to git pull.
git pull https://github.com/(name of owner)/(name of repo).git main
You will be prompted to resolve merge conflicts if any exist.
Halftime! Switch sides!
Trade places with your partner and repeat the exercise.
GitHub Issues
Issues are a useful feature of GitHub.com that can greatly improve your workflow. The user interface is fairly easy to figure out. This is just a plug to encourage everyone to make them a part of their workflow!
Uses for Issues
- Pointing out a bug or feature request in someone else’s repository
- Making a to-do list for yourself
- Managing projects by assigning tasks to collaborators
- Maintaining a record of rich information about your work
- Troubleshooting problems with code by searching existing issues

Example: rslurm’s issue queue contains issues created by both collaborators and users
Formatting issues
You can reference users, commits, pull requests, and other issues in the text of your issue, and they will automatically be linked.
To reference users, use the @ sign followed by their name.
To reference commits, use the first 7 digits of the commit’s hash (it will look something like 5d1001b).
To reference pull requests and other issues, use the # sign followed by the number ID of the pull request or issue. They go up sequentially starting at #1.
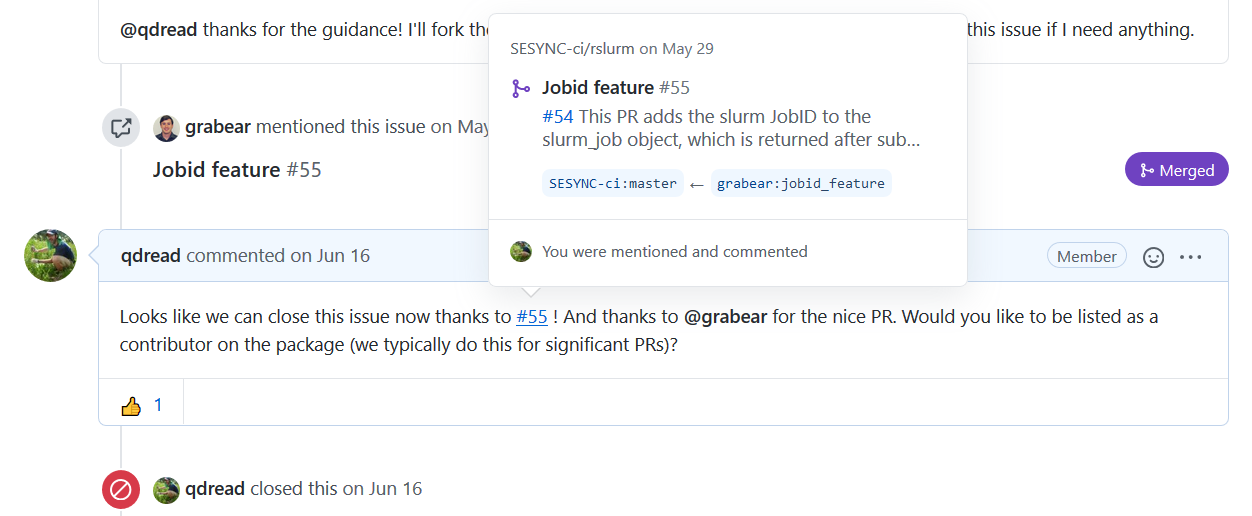
Example: comments on an issue in rslurm referencing users and a pull request
Issue labels and assignees
You can put labels on issues to tag them by topic.
You can also assign issues to collaborators on your project, to designate who is responsible for resolving the issue.

Example: issues assigned to different collaborators
Closing resolved issues
Once an issue is resolved, you can close it. It will no longer appear as an outstanding issue, but all closed issues are still archived as part of the repo on GitHub.
Troubleshooting with issues
If you run into an issue with an R package or other software, it is often helpful to go to the repo page for that software and search the (open and closed) issues there. This can be a more targeted way to find a solution for your problem, compared to searching Google or StackOverflow.
Learn more!
Read GitHub’s guide to issues to learn more about how to use issues for project management.
A final note on issues: Issues are a feature of GitHub only, not git. So if you clone a repo from GitHub to somewhere else such as GitLab, the issues will not automatically be copied over. You will need to import the repo to get the history of issues, pull requests, and comments.
GitHub Pages
GitHub provides free* web hosting through GitHub Pages. You can create a site associated with your user account
(jdoe.github.io) or a page for any of your repos
(jdoe.github.io/mycoolproject).
* Because GitHub is owned by Microsoft it is not guaranteed that any of the services they provide will be free forever. It is for now.
How does it work?
When you designate a repo as a page, GitHub will build the Markdown (.md) files in the repo into
HTML files, creating a complete static site, using software called Jekyll.
Note that you can also create the HTML pages yourself, either by using RStudio to knit your Markdown or RMarkdown files to HTML, or manually.
There are many ways to customize the layout and theme of your page. This lesson does not go into much detail about that. The first place to look for more information is the official GitHub Pages documentation. We have also compiled a list of resources, tutorials, and templates.
The Minimal Mistakes theme is one of the most widely used free templates. You can fork the Minimal Mistakes repo into your account and add your content to it. Academic Pages is a modified version of Minimal Mistakes that is designed for academics. If you use either of these templates, consider donating to the developer on PayPal.
All the SESYNC cyberhelp lesson pages were created with GitHub Pages, including this one! The homepage of the popular R package sf is also a GitHub Page, as are this collection of R stats tutorials and many academic pages including this lab website.
Creating a personal site
In this example, we will create a page associated with your user account.
Create a new repo on GitHub.com. In order for GitHub to recognize that this repo is your personal site,
you need to name it (your username).github.io.
Next, go to the Settings page of your repo and scroll down to the GitHub Pages section.
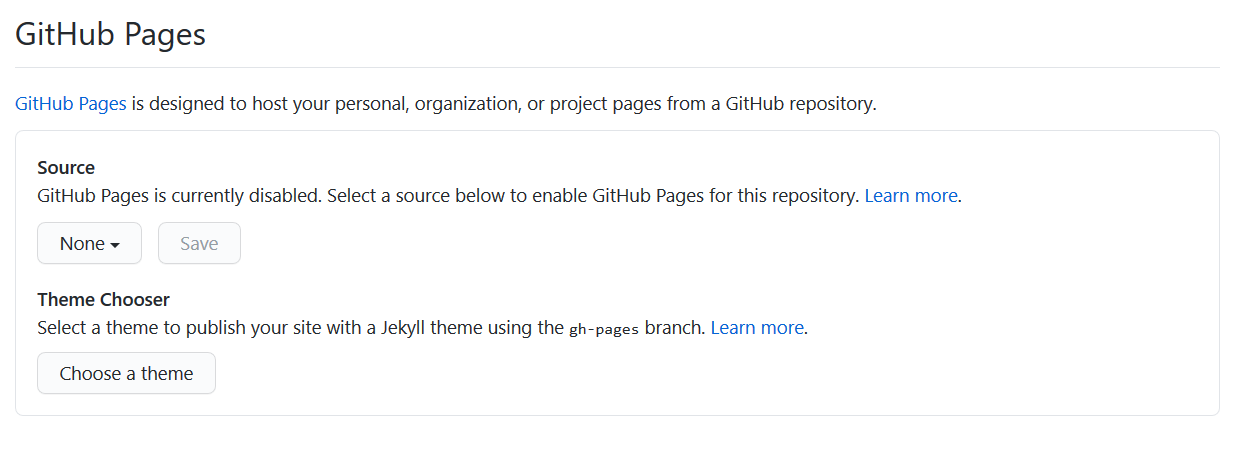
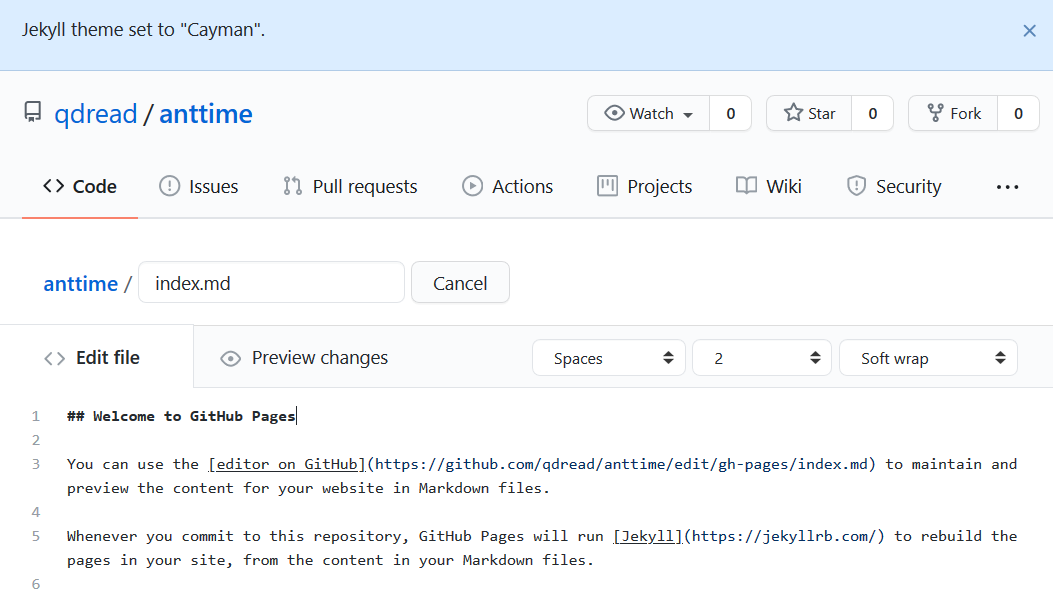
Choose a pre-made Jekyll theme for your personal site.
Your site is now being built at (your username).github.io! The first time will take a few
minutes but subsequent pushes will appear on the site after only a few seconds.
You will be redirected to an editor window where you can modify the homepage (index.md).
This is a Markdown file that Jekyll will render into HTML to become the homepage for your project.
Of course, it is better practice not to edit files on the web; we need to clone the
repo locally and edit the files there.
Clone the repo locally, either using the command below or by creating an RStudio project. Again, if you are cloning using the command line, make sure you are in the correct directory first.
git clone https://github.com/jdoe/jdoe.github.io
Cloning into 'jdoe.github.io'...
The repo contains the bare bones of what Jekyll needs to build the site:
a YAML configuration file called _config.yml and a homepage called index.md.
The _config.yml file currently contains only a single line, specifying the site theme.
The leading underscore _ of the filename tells Jekyll not to process the file as a page.
Let’s add a title to the configuration file. There is a Jekyll documentation page listing the site-level variables you can include in the configuration file.
Open _config.yml and add a line with your site title in quotes:
title: "My Site"
Stage, commit, and push.
git add _config.yml
git commit -m "Add site title to config"
git push
The site will be rebuilt by Jekyll and you should see the new title shortly.
If you would like to preview the site locally rather than having to push it live to the web to see your changes, you will need to install Jekyll on your local machine. Describing how to do that is out of the scope of this lesson. Follow the Jekyll installation instructions.
In Exercise 1 below, you will make a change to the homepage and push it.
Creating a project page with a premade template
In addition to your personal site at username.github.io, you can also make pages associated with your
individual projects on GitHub.
To make one of your GitHub repos into a page, go to the Settings page of one of your existing repos and scroll down to the GitHub Pages section as you did for your user page.
Select a premade Jekyll theme for your page.
This will automatically create a branch called gh-pages and open a code editor window for the index.md file.
You can close this window without any further action needed.
After a few minutes, your site will be live at username.github.io/reponame!
This window will pop up but no further action is needed.
Instead of editing the Markdown online, it’s better to pull the gh-pages branch locally, make changes, and commit and push them back up to the remote repo.
Let’s use our newfound branching skills to do that!
First, open the RStudio project for the repo you just added a page to.
Go to your terminal, create a branch called gh-pages and switch to it.
git checkout -b gh-pages
Switched to a new branch 'gh-pages'
Next, pull the gh-pages branch from the remote origin.
git pull origin gh-pages --allow-unrelated-histories
The --allow-unrelated-histories option allows you to pull the pages branch, which was created
with a fresh history not including the commit history from your main branch.
Because this is merging a branch with a different history, a Vim text editor window will pop up prompting you to enter a merge commit message.
You need to confirm this message and quit Vim by typing :q and pressing Enter.
Hopefully you don’t get stuck in Vim, which is notoriously hard to exit.

 * branch            gh-pages   -> FETCH_HEAD
Merge made by the 'recursive' strategy.
 _config.yml |  1 +
 index.md    | 37 +++++++++++++++++++++++++++++++++++++
 2 files changed, 38 insertions(+)
 create mode 100644 _config.yml
 create mode 100644 index.md
Now you can make changes locally, commit them, and push them. Every time you do, the project page will rebuild!
In Exercise 2 below, you will collaborate with your partner and both make changes to a project page.
Exercises
These exercises will give you a chance to practice the advanced git techniques you learned in this lesson, (branches, forks, and pull requests), using GitHub Pages as an example.
Exercise 1
- Create a local branch in your GitHub Pages repo (
yourname.github.io). - Edit the
index.mdfile to say something about yourself. - When you are satisfied, stage, commit, and push the change to the branch on the remote origin.
- Merge the branch back into the main branch and push the main branch to the remote.
- Take a look at your newly modified site!
- If you like, delete the test branch locally and remotely.
Exercise 2
This exercise should be done in pairs. Take turns being the Owner and Collaborator.
Collaborator:
- Fork the Owner’s repo in which he or she created the GitHub Page at the end of this lesson.
- Clone the forked repo locally.
- Create another branch from the
gh-pagesbranch, switch to it, and set it up to track a remote branch. - Make a change to the homepage of the repo (
index.md) in that branch. - Stage, commit, and push.
- Make a pull request from the branch you just modified, comparing to the
gh-pagesbranch on the Owner’s repo.
Owner:
- Create a new local branch and pull the Collaborator’s pull request branch into it.
- Review the changes the Collaborator made, modifying if necessary by adding additional commits. Note: if you want to add commits to the Collaborator’s branch, the Collaborator will have to give you push access to it on GitHub.
- Accept the pull request on GitHub.com, merging the Collaborator’s branch with your
gh-pagesbranch. - Pull the newly merged
gh-pagesbranch locally. - Take a look at your newly modified project page!
- If you like, delete the pull request branch locally.
Solutions
Exercise 1
- In the repo you created for your personal GitHub Page (
yourname.github.io), executegit checkout -b (name of new branch). - Open
index.mdand add some text. - Stage, commit, and push:
git add index.md
git commit -m "Add content"
git push -u origin (name of new branch)
- Merge the branch into the main branch and push to the remote.
git checkout main
git merge (name of new branch)
git push -u origin main
- Delete the now-merged branch on your local machine and remotely.
git branch -d (name of new branch)
git push origin --delete (name of new branch)
Exercise 2
Collaborator:
- Navigate to
https://github.com/(username of owner)/(name of repo)and select “Fork” in the upper right to fork the repo into your own account. - Clone the repo by going to your terminal locally and executing
git clone https://github.com/(your username)/(name of repo).git. (As always, make sure you’re cloning into the right place so you don’t get nested repos.) - Create the branch, specifying that you are creating it from
gh-pages, and set it up to track the remote.
git checkout -b (name of new branch) gh-pages
git push -u origin (name of new branch)
- Edit the file
index.md. - Stage, commit, and push:
git add index.md
git commit -m "Edit index.md"
git push
- Navigate to
https://github.com/(your username)/(name of repo)and open the “Pull Requests” tab. - When prompted to select branches to compare (across forks), select your new branch and the Owner’s
gh-pagesbranch. - Create the pull request. The Owner should get a notification.
Owner:
- To create a new branch and pull the Collaborator’s pull request branch into it, run:
git checkout -b collab-pullrequest-branch
git pull https://github.com/(collaborator name)/(repo name).git (name of pull request branch)
- You will need to sign off on the merge commit message and quit Vim by typing
:qand pressingEnter. - Open and view
index.md. If you want to add a commit to this, you can do so by having the Collaborator go to the page on github.com for their forked repo, open the “Settings” tab, click “Manage access”, and invite you with the proper permissions. Then you can edit the file and stage-commit-push as usual. - Navigate to
https://github.com/(username of owner)/(name of repo)and open the “Pull Requests” tab. - Accept the pull request through the interface on GitHub.com.
- Pull the
gh-pagesbranch locally (because you merged remotely):
git checkout gh-pages
git pull origin gh-pages --allow-unrelated-histories
- Again you will need to sign off on the merge commit message and quit Vim by typing
:qand pressingEnter. - Delete the pull request branch locally using
git branch -D collab-pullrequest-branch. (The-Dis needed to confirm that you are deleting an unmerged branch, because you merged it remotely not locally.)
If you need to catch-up before a section of code will work, just squish it's 🍅 to copy code above it into your clipboard. Then paste into your interpreter's console, run, and you'll be ready to start in on that section. Code copied by both 🍅 and 📋 will also appear below, where you can edit first, and then copy, paste, and run again.
# Nothing here yet!