Collaborative & Reproducible Research
Handouts for this lesson need to be saved on your computer. Download and unzip this material into the directory (a.k.a. folder) where you plan to work.
Collaboration & Code
As your research project moves from conception, through data collection, modeling and analysis, to publishing and other forms of dissemination, its components can fracture, lose their development history, and—worst of all—become conflicted or lost. This lesson introduces strategies for structuring your collaboration, focusing on the core principle of “version control” (VC) and the related software and cloud solutions. The main objective is to demonstrate that version control is much more than history, it is a way for distributed teams to work efficiently on a shared codebase. Version control is essential for reproducible research.
A cloud hub stores project files and their history. Researchers are spokes on the wheel, each working on a local repository. Project integrity is maintained by rules for synchronizing commits between the hub and spokes when users execute a push or pull.
Lesson Objectives
By cultivating new habits for scripting, documenting, and committing, much of the research cycle can be made reproducible.
Credit: Philip Guo
- Learn about software repositories
- See that VC equals efficient communication
- Identify attributes of reproducible research
- See how RStudio + git facilitate collaboration
Specific Achievements
- Make “commits” to a repository with git
- “Push” and “pull” project work to GitHub
- “Merge” your work with a collaborator’s via GitHub
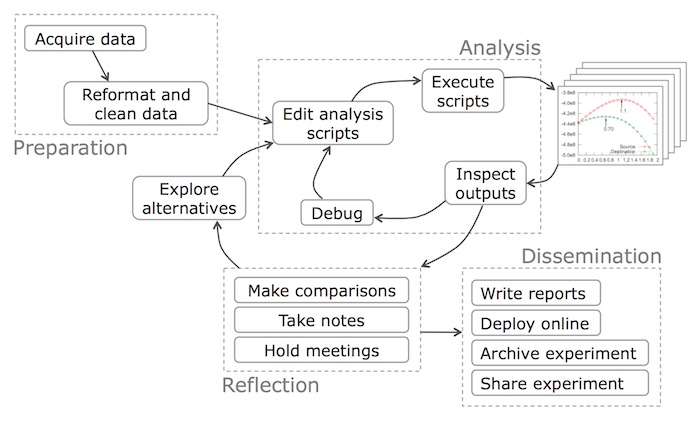
Reproducible Pipeline
The result of reproducible research is more than a published paper. It includes the whole data-to-document pipeline. In a typical socio-environmental synthesis project, a finished pipeline ideally includes the following steps:
- Acquire raw data from online repository.
- Extract, transform, and load data into storage for analysis.
- Perform data analysis (e.g. model inference) and visualization.
- Update documentation and reports.
- Publish results, including reports, data and code/software.
The pipeline is a direct path through the research cycle, avoiding all its twists and turns, so others may reproduce your final analysis.

Credit: Philip Guo
A UC Berkeley professor who is a strong advocate for open science, Carl Boettiger, has released several reproducible pipelines on GitHub. For example, check out his work leading up to the paper “Pretty Darn Good Control” in the project pdg_control.
RStudio + git
Note: The rest of this lesson walks you through basic git actions with RStudio. If you are a Python user, check out the abbreviated version of the basic git lesson with JupyterLab. SESYNC’s JupyterLab server has the JupyterLab git extension installed to make it easy for you to work with git-versioned Python code in Jupyter.
In RStudio, open the handouts directory that you unzipped from this lesson’s handouts.zip file.
(If you are participating in the Summer Institute, instead login to RStudio on lab.sesync.org,
and handouts.zip will already be uploaded for you.) Click on handouts/handouts.Rproj to open the directory as a project.
RStudio provides a GUI (a point-and-click interface) to the core tools provided by git.
Every folder that contains a “*.Rproj” file is an RStudio project (simply a collection of files
and configuration settings). We use git to turn our project into a
“repository,” or “repo” for short, a term from the software development community that encompasses a
project along with its development history. On your local machine, the repository
simply appears as a folder with project-associated files. git tracks the history
of the changes you and collaborators have made to the project files over time.
Note on terminology and configuration
As of October 1, 2020, all new repositories created on GitHub will have a default branch
called main. Previously, the default name was master. The change was
made to promote inclusive language in the version control world. SESYNC has updated
the GitLab and teaching lab servers to match this new default. However, the git client that is running
on the SESYNC RStudio server still defaults to master if you create a repository locally,
unless you configure it as described below.
You should also be aware that any code, documentation, tutorial, or StackOverflow
post written before 2020 will assume your default branch is called master.
If you are doing this lesson on your local machine, we recommend setting the
default branch name for new repositories you create to main. Enter the
following into your terminal prompt. You can access the prompt from RStudio’s
Terminal tab.
git config --global init.defaultBranch main
This option is available for git version 2.28 or later.
Initialize git
Convert your RStudio project to a git repository by enabling version control, available from the menu bar under “Tools” > “Version Control” > “Project Setup”.
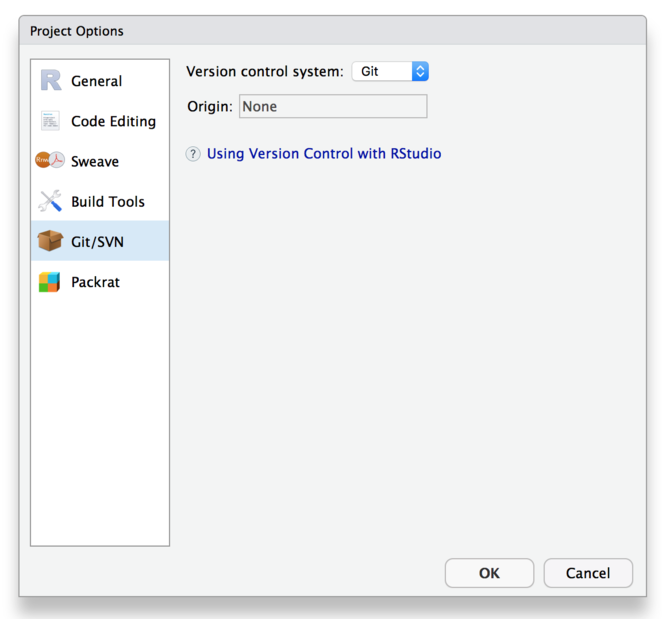
Adding a git repository creates a hidden folder in your project called .git,
storing all the data about your project’s current and past states.
Commit
Once RStudio refreshes your project, there will be a “Git” tab in the same window as the Environment tab. The window shows files that have content not already committed in the current state of your project. At first, this will be every file in the directory, because you created a blank repository. Choose “Commit” to open a new window for easy staging and committing.
- check
README.mdandhandouts.Rproj - write a short and informative (<50 characters) commit message
- commit
You will get an error message! Read on to resolve it.
For GitHub to associate commits with your account, configure git with your GitHub username and email address. (If you don’t have a GitHub user account yet, sign up for one now.)
git config --global user.name jdoe
git config --global user.email jdoe@sesync.org
Personal access token
When you set up your GitHub user account, in addition to selecting a username and password, you will also need to create a personal access token. Go to the page on GitHub.com to create your token, follow the instructions, copy the token, and save it in a safe place.

Screenshot of personal access token page after creating token
As of August 2021, a personal access token is now required to authenticate
pushing from a local repo to a remote repo on GitHub.com. The link above is to a GitHub documentation page
with very detailed instructions on how to navigate to the settings page where
you can generate a token. Follow these instructions! When you are prompted to select the scopes
(permissions) to give the token, check the box marked repo. When the token
is generated, copy it and save it in a safe place; you will need it in a moment.
For long term storage, consider using a password manager like LastPass.
Configure your username and email address by entering the git config
commands into RStudio’s Terminal window.
After configuring your username and email address, return to the Commit
window and commit your changes.
Now, author information will be associated with the commit.
In the future, configure your user.name and
user.email before starting a project.
This is a one-time configuration for each computer on which you use
RStudio, so you don’t have to repeat this for any subsequent repositories you
create on this machine.
Saving, staging, and commiting are each separate steps, none of which imply any of the others. This may seem like a hassle, but is a good thing! As your project grows larger, you will frequently save changes you don’t want to commit: staging lets you choose what changes get packaged into a commit.
History
The history of your project shows a single commit. Every new commit will be chained on top of a preceding commit.
Create the Hub
Sign in on GitHub, then create an empty repository.
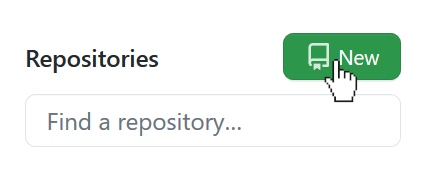
- Give your repository the same name as your RStudio project.
- Add a short “tag line” about your workshop experience.
- Do not check the “Initialize this repository with a README” box.
You have created a repository that has no history—it will accept the commits made in RStudio without conflict. The quick start information provided by GitHub explains how to finish configuration of your local git repo. Copy the code under “…or push an existing repository from the command line” and paste it into the RStudio Terminal window.
Make sure that HTTPS is selected, not SSH, at the top of the page, or you’ll
get the wrong code to copy. Also, the line git branch -M main is unnecessary if you already configured
the default branch to be called main locally.
git remote add origin https://github.com/jdoe/handouts.git
git push -u origin main
IMPORTANT: When you are prompted to enter your password,
paste your GitHub personal access token into the prompt, not the password
that you use to sign in to GitHub.com in your browser. On Windows you will need to use
Shift+Insert or right-click with the mouse to paste, because Ctrl+V will not
work in a terminal window. You won’t see asterisks appearing when you paste the token,
as you do in typical password prompts, but don’t worry, it’s there!
After this first push, you will no longer need to use the terminal to push changes. You can use the RStudio dropdown menu to both commit and push changes, and you won’t have to enter the token each time.
Go back to your GitHub account and check out your “hub”.
README.mdis a Markdown file giving basic information about the repository.- There is a list of files, including a folder for data.
- You are looking at a branch called
main. - The commit history is available from the top bar.
- The “Code” button provides a URL for collaborators to clone the repo.
In addition to being the center point for sharing commits with collaborators, GitHub is a rich platform for managing projects and inspecting the history.
Syncing Repos

The origin is the central repository; in this case it lives on GitHub. Every member of the team gets a local copy of the entire project, called a clone.

Cloning is the initial pull of the entire project and all its history. In general, a worker pulls the work of other teammates from the origin when ready to incorporate their work, and she pushes updates to the origin when ready to contribute her own work.
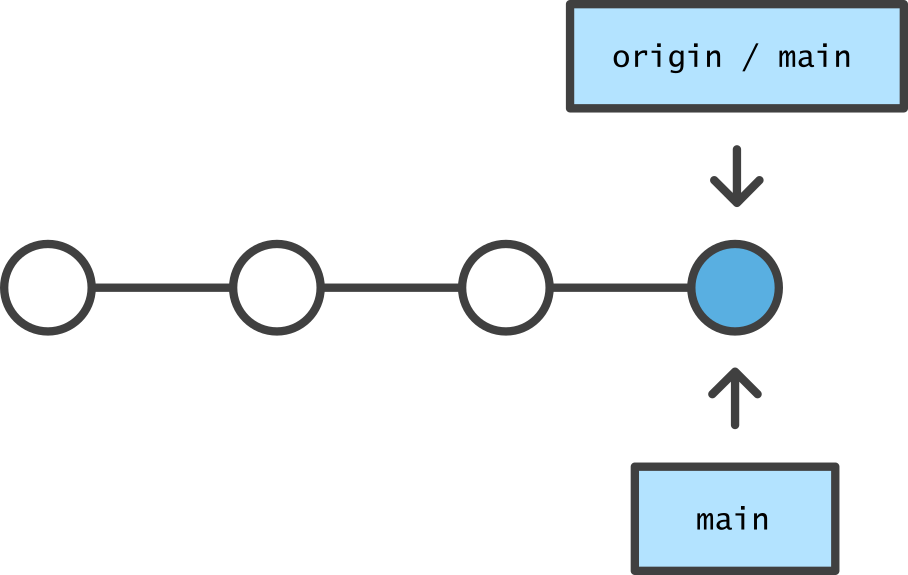
A git repository is a network of commits, although the current network is a tree with no splits. After a worker creates a clone, the local repo is in the same state as the origin.
Notice that the local and remote (origin) repos are both on a branch called main in the diagram below. This is the default name given to the primary version of the repository.
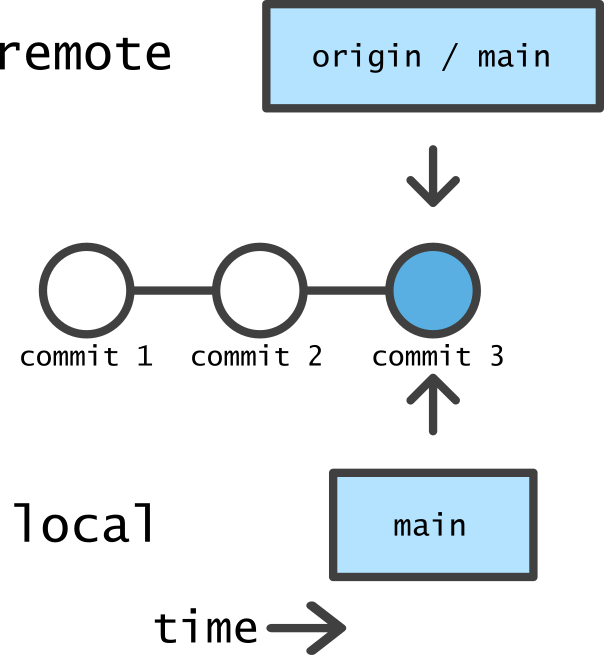
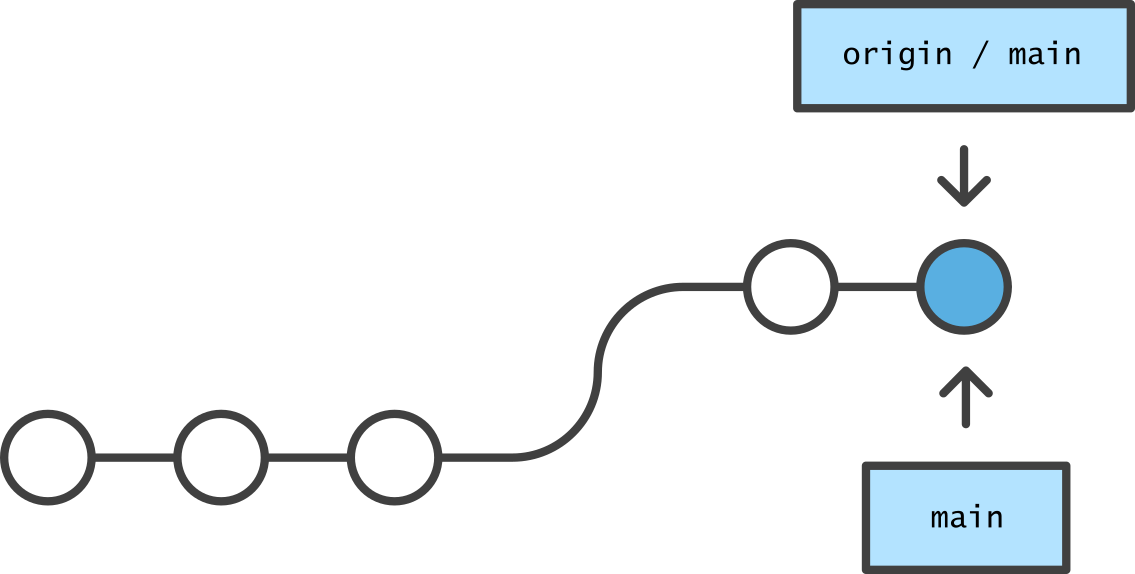
When the origin has commits that do not exist in the local repo, it has gotten ahead and a pull is required to synchronize state.
A pull, or initially a clone, applies commits copied from the origin to your local repo, as if you had created identical commits locally.
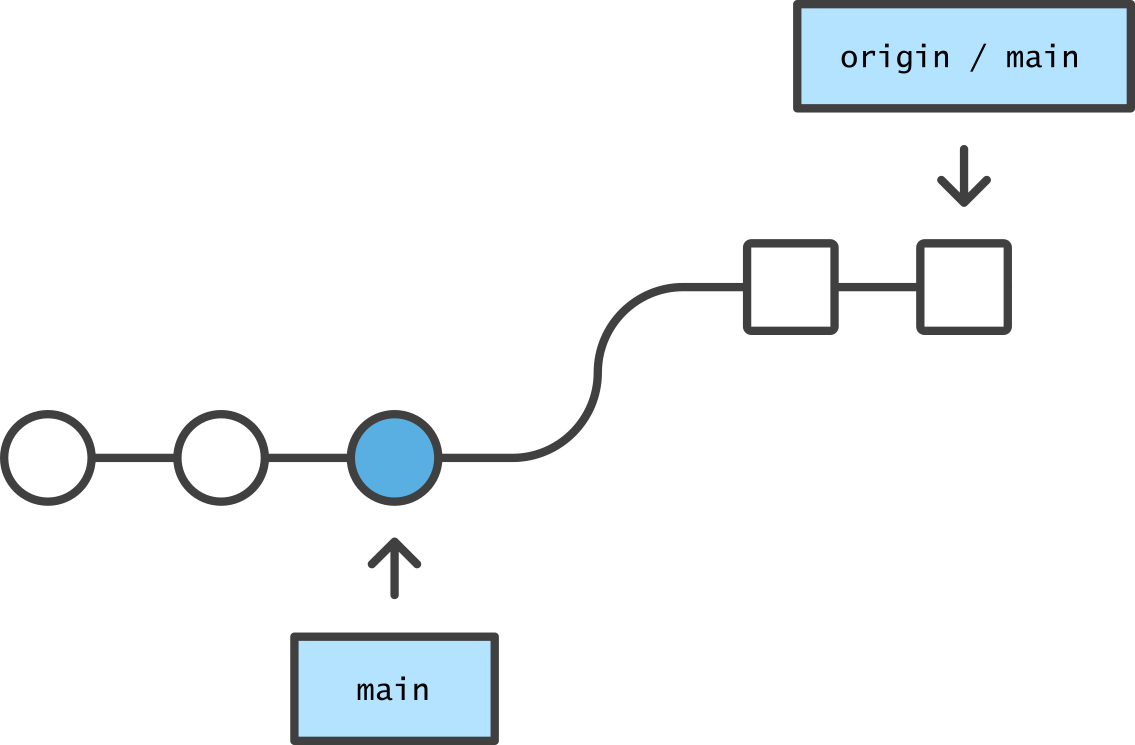
In the opposite situation, commits created locally are not immediately synchronized to the origin.

A push copies local commits to the origin and applies them remotely.
An essential component of version control is the ability to merge commit histories that have diverged.
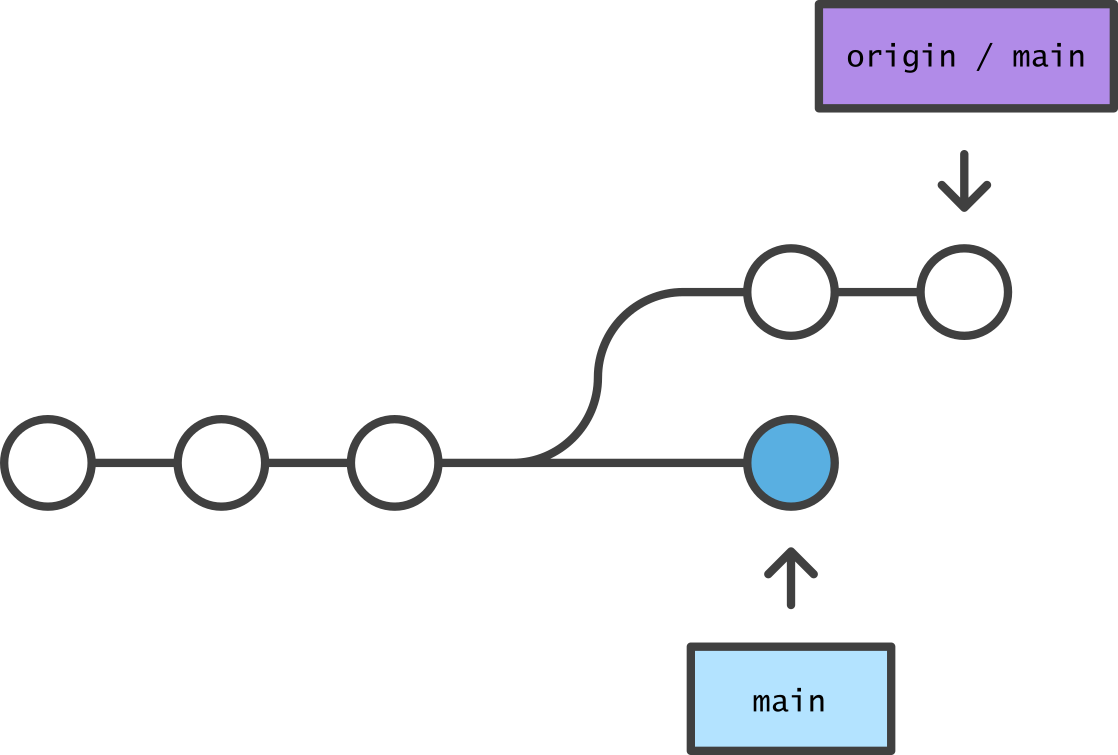
The commit graph splits any time different commits are applied to the same “parent” commit. Automatic merging done by git integrates the changes from both into a new “merge commit,” unsplitting the commit graph.
The origin will not accept a push that requires merging. In order to preserve integrity, the contributor is always responsible for overseeing the merge on a local clone.
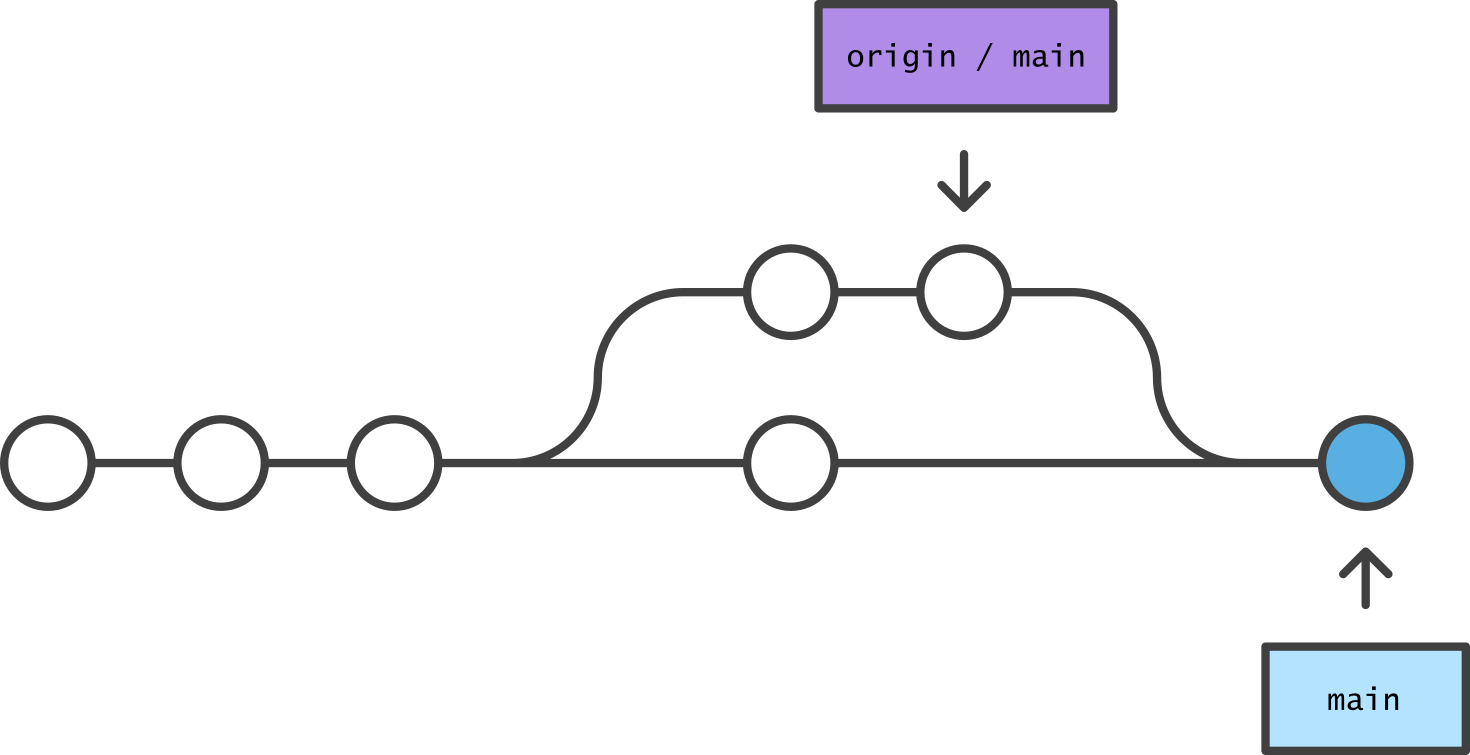
After the merge commit has been created locally, the same situation now exists that was depicted above. The conflict has been resolved and the origin will now accept a push.
Collaborators
Collaboration that goes beyond commenting on a final report—integrated work on a project from start to finish—raises serious challenges. Distributed repositories, managed by git, help to answer these questions.
- Data, script, or report: who has the latest version?
- Will a collaborator’s work erase or break your own?
- How can you recover a working version of a pipeline?
Project Integrity
- The origin becomes the official “latest” version, even if your work is a few commits ahead.
- Diverging files are usually automatically merged by git.
- Manual re-integration is aided by the ability to “checkout” the project at any commit.
Version control software works well with text files. Large, non-text components of your project (e.g., very big or binary data files) can slow down any cloning, merging or branch switching. For that reason, data rarely live in a repository with code. Keeping data and code separate also facilitates data reuse—it’s not tied to one pipeline.
Add a section where you can list collaborators to the README.md file. Our aim is
to let your collaborators update this list with their own name, so only include
yourself. You can use any text editor, and RStudio’s is quite handy.
## Collaborators

- J. Doe
Stage
Before you can commit changes involving a new file, you have to tell git which modifications you want to commit by staging.
- Go to the “Git” tab in RStudio.
- Select “Commit” to open the “Review Changes” window.
- Select “Staged” to add modifications (hence “M”) by “README.md”.
Commit
- Enter a brief (<50 characters) descriptive message about the commit.
- Commit!
- Close the “Review Changes” window.
Push
Look at the “Git” tab again and notice that your branch is “ahead of origin/main”. Push the commit to your GitHub repo.
If you view the “History” tab you can now see that the local repo and the remote repo have an identical state.
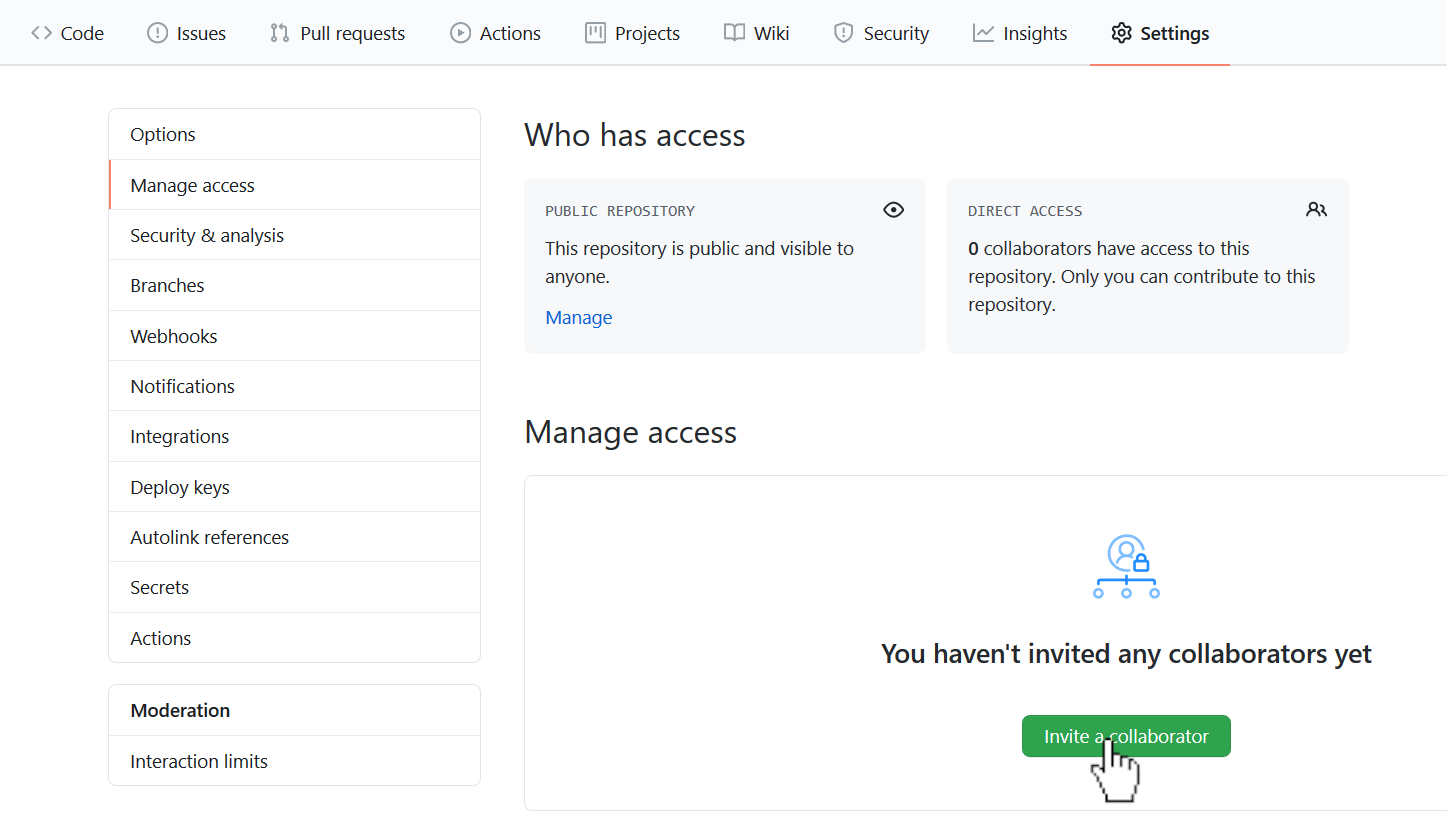
GitHub Collaborators
Even on public GitHub repos, only the owner has “push access” by default. The owner can allow any other GitHub user to push by inviting collaborators under the settings tab (Settings > Manage access > Invite a collaborator).
Choose a partner for this exercise and split the two roles below between you. Be sure to watch each other perform the steps assigned to your individual roles, either in person or by screen sharing.
- Owner: add your partner as a collaborator.
- Collaborator: accept your partner’s emailed invitation.
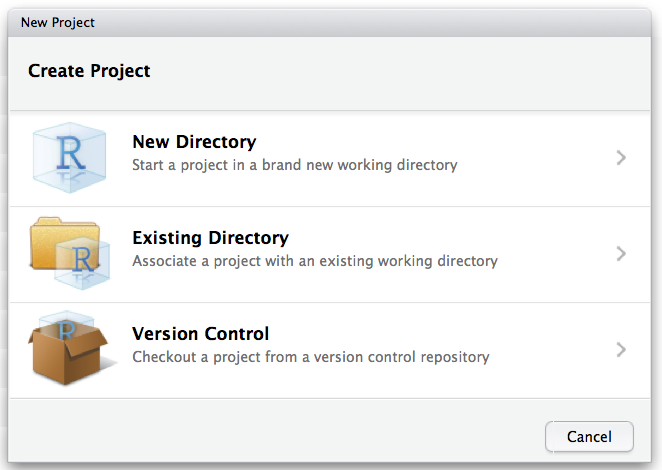
Create a Second Spoke
The Collaborator now needs to create a new project in RStudio by cloning the Owner’s project. Under the “File” menu item, choose to create a New Project, and then choose “Version Control”.
You cannot use the same name for two project folders! The Collaborator should choose a different name for their copy of the Owner’s project.
Push & Pull
- Collaborator: Add your name to the list in the “README.md”.
- Collaborator: Stage, commit, and push (up arrow) your modifications.
- Owner: Pull (down arrow) to apply your neighbor’s commit.
If you view the “History” tab, you can see that both the remote and local repo are both updated with a record of the changes made by both collaborators!
Merge
In the previous example, everything happened in sequence. First the owner committed
and pushed, then the collaborator pulled, committed, and pushed, then the owner
pulled again. Each time, changes were made to the most recent “official” version
of the repo, so there were no conflicts. However, if two collaborators make
changes to the same line of the same file at the same time, git does not know automatically
which version to use. However, you can use git to help resolve the conflict because it
identifies exactly where the conflicts are so that you can fix them.
You both realize it would have been good to include your affiliation along with your name. Do you need to circulate “README.md” to each collaborator in sequence for an update? No!
- Ower AND Collaborator: edit your entry in
README.md. - Ower AND Collaborator: stage, commit, & push.
- Owner OR Collaborator: if you receive an error message, it tells you exactly what to do.
If you receive the merge conflict message, first pull your collaborator’s change
from the remote repo. Then, open README.md and you will see that
git has put some markers into the file to indicate where the conflict is. Each
of the two possible versions appear in the file, one after the other.
<<<<<<< HEAD
- John Doe (SESYNC)
- Jane Roe
=======
- John Doe
- Jane Roe (State U.)
>>>>>>> 17a88283234fe8cda436b
You can also see that the file is conflicted in the Commit window because it now has an orange “U” next to it, for “unresolved.”
Resolve the conflict by deleting the parts of the conflicted section that
you do not want to keep. Then delete all the conflict markers. Now, if you
click on the checkbox for README.md in the Commit window, the “U” will
change to an “M” and you should be able to commit and push without error.
After you successfully complete a merge, move back to your own “handouts” project in RStudio to access your own worksheets.
Important note: If you find resolving merge conflicts confusing, the best way to avoid them is to pull before you push! That means always pull the most recent version of the repo from the remote before making changes. That way, merge conflicts will only occur if you and your collaborator(s) are working on the code at the exact same time.
What about Data?
The scripts executed in your pipeline are plain text files, but the project may need other assets, such as data, figures, or private configurations.
- Non-text files get little benefit from
git, and have large costs. - Large data files should not be version controlled by
gitand usually live outside the repo (as an “integration”). - Private information (e.g., personal data) should not be committed to a public repository.
External Data
The most common pipeline integration is shared data storage.
- Local area network file share (e.g. “Z:\\…”)
- Cloud storage (e.g. Dropbox, Google Drive)
- Database (e.g. a PostgreSQL server)
Link to the Data
One good practice is creating “symbolic links” (a.k.a. shortcuts) to data files that live outside a project repo; these let your code use paths that point inside the repo for data.
file.symlink(
  from = ...,
  to = 'data'
)
If you replace the ... above with the path to your data, such as the location
of your Dropbox folder or network drive, the shortcut data works like a normal path to your data,
as if it were inside your repo. This usually works seamlessly but could be risky on
certain operating systems or early versions (before 1.6) of git. It is
sometimes possible to add all your data to a commit by accident with git add ..
To avoid this, it is a good idea to either update git or “ignore” all files
and folders below data/ by adding the line /data/** to the “.gitignore”
file in your repo. The leading / refers to the root of the git repository,
not to the root of your filesystem.
A Plug for Reproducibility
Reproducibility is a core tenet of the scientific method. Experiments should be reported in sufficient detail for a skilled practitioner to duplicate the result.
The principle equally applies to modeling and data analysis.
Hallmarks of Reproducibility
| Reviewable | All details of the method used are easily accessible for peer review and community review. |
| Auditable | [Private] records exist to document how the methods and conclusions evolved. |
| Replicable | Given sufficient resources, a skilled practitioner could duplicate the research without any guesswork. |
| Open | The orginator grants permissions for reuse and extension of the research products. |
This table is adapted from “Best practices for computational science: Software infrastructure and environments for reproducible and extensible research” by V. Stodden and S. Miguez (2013).
Habits to Cultivate
| Reviewable | Thoroughly comment scripts and share continuously with collaborators |
| Auditable | Maintain project history to correct mistakes when necessary |
| Replicable | Provide “one-click” file & data sharing of a streamlined analysis “pipeline” |
| Open | Publically release on GitHub (or similar) with (implied) open licensing |
Learning to use git will take care of much of the work needed to make your research reproducible. Once you become efficient at staging, commiting, pushing and pulling, it will become the natural way to communicate with your collleagues through collaborative development of an analysis pipeline.
Future Directions
- Learn more git: merge conflicts, reversion, and branching!
- Share your work for reuse and extension.
- Make trying new analysis as easy as branching.
- Contribute beyond your own projects.
The repository you created is an example of the heart of a distributed workflow. Putting the origin of your project on GitHub (or similar) will make it accessible not only by your collaborators, but also available for review and extension by your research community.
Using advanced git to manage contributions to the project as a branching and merging “tree” of commits accomplishes two objectives. First, work can safely proceed in parallel, on separate branches if necessary. Second, a recoverable (and auditable) trail of changes is immediately available in the project history.
The latest software for modeling and analysis in your research field may already be on git. Build better pipelines by contributing bug reports or even pull requests to projects integral to your own work.
You might find GitLab’s git cheatsheet helpful!
Exercises
Exercise 1
Make the remaining worksheets show up in your “handouts” repository on GitHub. Remember the three steps: stage, commit, and push.
Exercise 2
Repeat the steps you walked through in pairs, as an Owner and Collaborator, but reverse the roles.
If you need to catch-up before a section of code will work, just squish it's 🍅 to copy code above it into your clipboard. Then paste into your interpreter's console, run, and you'll be ready to start in on that section. Code copied by both 🍅 and 📋 will also appear below, where you can edit first, and then copy, paste, and run again.
# Nothing here yet!